

Even if you’ve never made homemade bread or worked with yeast before, this homemade crusty artisan bread is for you. It’s the perfect beginner recipe because it only requires 4 ingredients without any special pans or mixer, there’s no kneading or complicated shaping involved, and 95% of the work is hands-off. Bread masters will appreciate this recipe too because it delivers with delicious flavor, a slightly crisp and mega chewy crust, and those signature soft holes inside like ciabatta or French bread.
Bread Beginners—Start Here
Have you ever wanted to master homemade bread? Real, crusty, chewy, delicious bakery-style loaves that taste incredible with dips, soups, sauces, and comforting dinners? This is where you start. This artisan bread recipe is for beginners, but even bread masters will appreciate its flavor and ease. It’s so fresh, so flavorful, and so surprisingly easy because it basically makes itself.
You only need 4 ingredients without any special pans or mixer, there’s no kneading, no poolish or dough starter required, and you can add herbs, cheeses, and spices to make a variety of bread flavors.
This base recipe will soon be on repeat in your kitchen. After you realize how easy it is to make real homemade bread, you’ll find any excuse to bake a loaf. You can even turn it into garlic bread and homemade croutons.

What is Homemade Artisan Bread?
When it comes to bread, the term “artisan” doesn’t mean 1 particular thing. But, generally, artisan bread is homemade, fresh, crusty, and deliciously rustic-looking. An artisan is a skilled worker, one who works with their hands. But ironically, there isn’t much “work” involved with this recipe.
Why You’ll Love This Bread Recipe
- Easier than you ever imagined
- Soft + flavorful
- Chewy, slightly crisp crust
- Shape however you want
- No special pans, poolish, or dough starter required
- Only 4 ingredients
- You decide the length of time it rests
Like sandwich bread, whole wheat bread, focaccia, homemade English muffins, seeded oat bread, and homemade bagels—the process is surprisingly easy. If you’re new to yeast, reference my Baking with Yeast Guide for answers to common yeast FAQs.
Only 4 Ingredients
The crustier and chewier the bread, the less fat in the dough—also known as a “lean dough.” We’re using a lean dough for our artisan loaf today. (If you’re curious, a “rich dough” is a soft bread dough with the presence of fat, such as butter and eggs—the kind we need for overnight cinnamon rolls, sweet potato dinner rolls, brioche, and honey butter rolls.) Without fat, we’re left with the basics.
- Bread Flour: While you can use all-purpose flour in this recipe, I strongly recommend using bread flour. Just like when we make olive bread, pizza bread, and asiago-crusted skillet bread, bread flour produces a stronger, chewier bread and that makes a big difference in a recipe with only 3 other ingredients.
- Instant Yeast: Instant yeast is key in this recipe. While you can use active dry if that’s all you have, any quick rise or instant yeast will produce flavorful results in less time. I use more yeast in this recipe compared to my cranberry nut no-knead bread and no-knead jalapeño cheddar bread. Why? Those doughs rest and rise at room temperature. However, for more flavor and just as much rise, I use more yeast and let this dough rest in the refrigerator. (Cool air slows the fermentation process.)
- Salt: You can’t make good bread without salt and for best flavor, I recommend a coarse salt, such as coarse sea salt. I find the bread’s flavor lacking with regular table salt.
- Water: I normally encourage you to use warm liquid with yeast because warm liquid helps the yeast work faster. However, use cool or room temperature water here. Not freezing cold, not super warm—cool to touch. 70°F (21°C) is great, but the exact temperature doesn’t matter as long as it’s not hot or warm. The cooler the water, the longer the dough takes to rise and, usually, the better the bread’s flavor. (This is important since there are so little ingredients to add substantial flavor!) We use the same cool water method for no knead honey oat bread.
- Optional Cornmeal: Dusting the pan with cornmeal adds a pop of flavor and a little crunch to the bottom crust. This is completely optional. If you have it, use it. If you don’t have it, don’t worry about it.
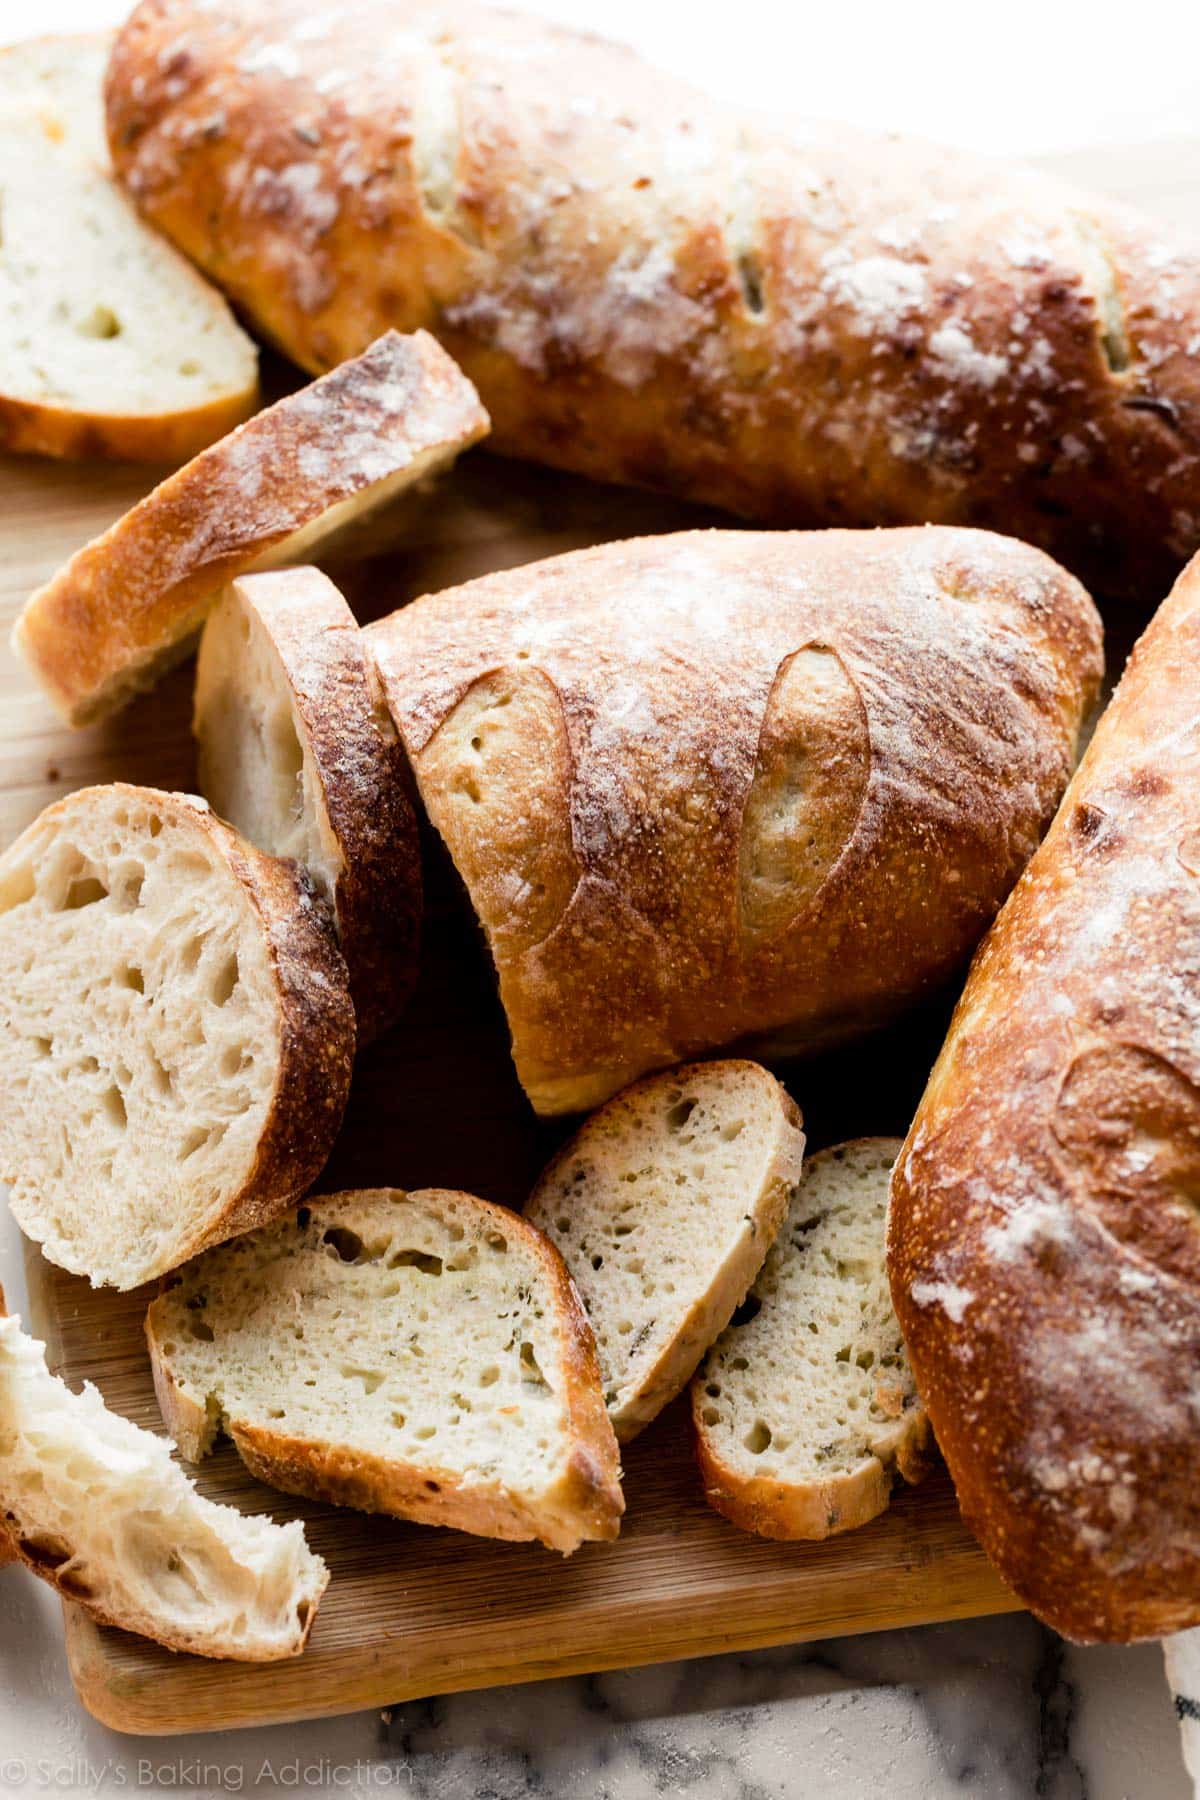
You can also add herbs and seasonings such as garlic, rosemary, dill, chopped onion, jalapeño, shredded cheese, chopped nuts, dried cranberries, etc. My no yeast bread is the quick bread alternative here—you can add flavors to that loaf, too!
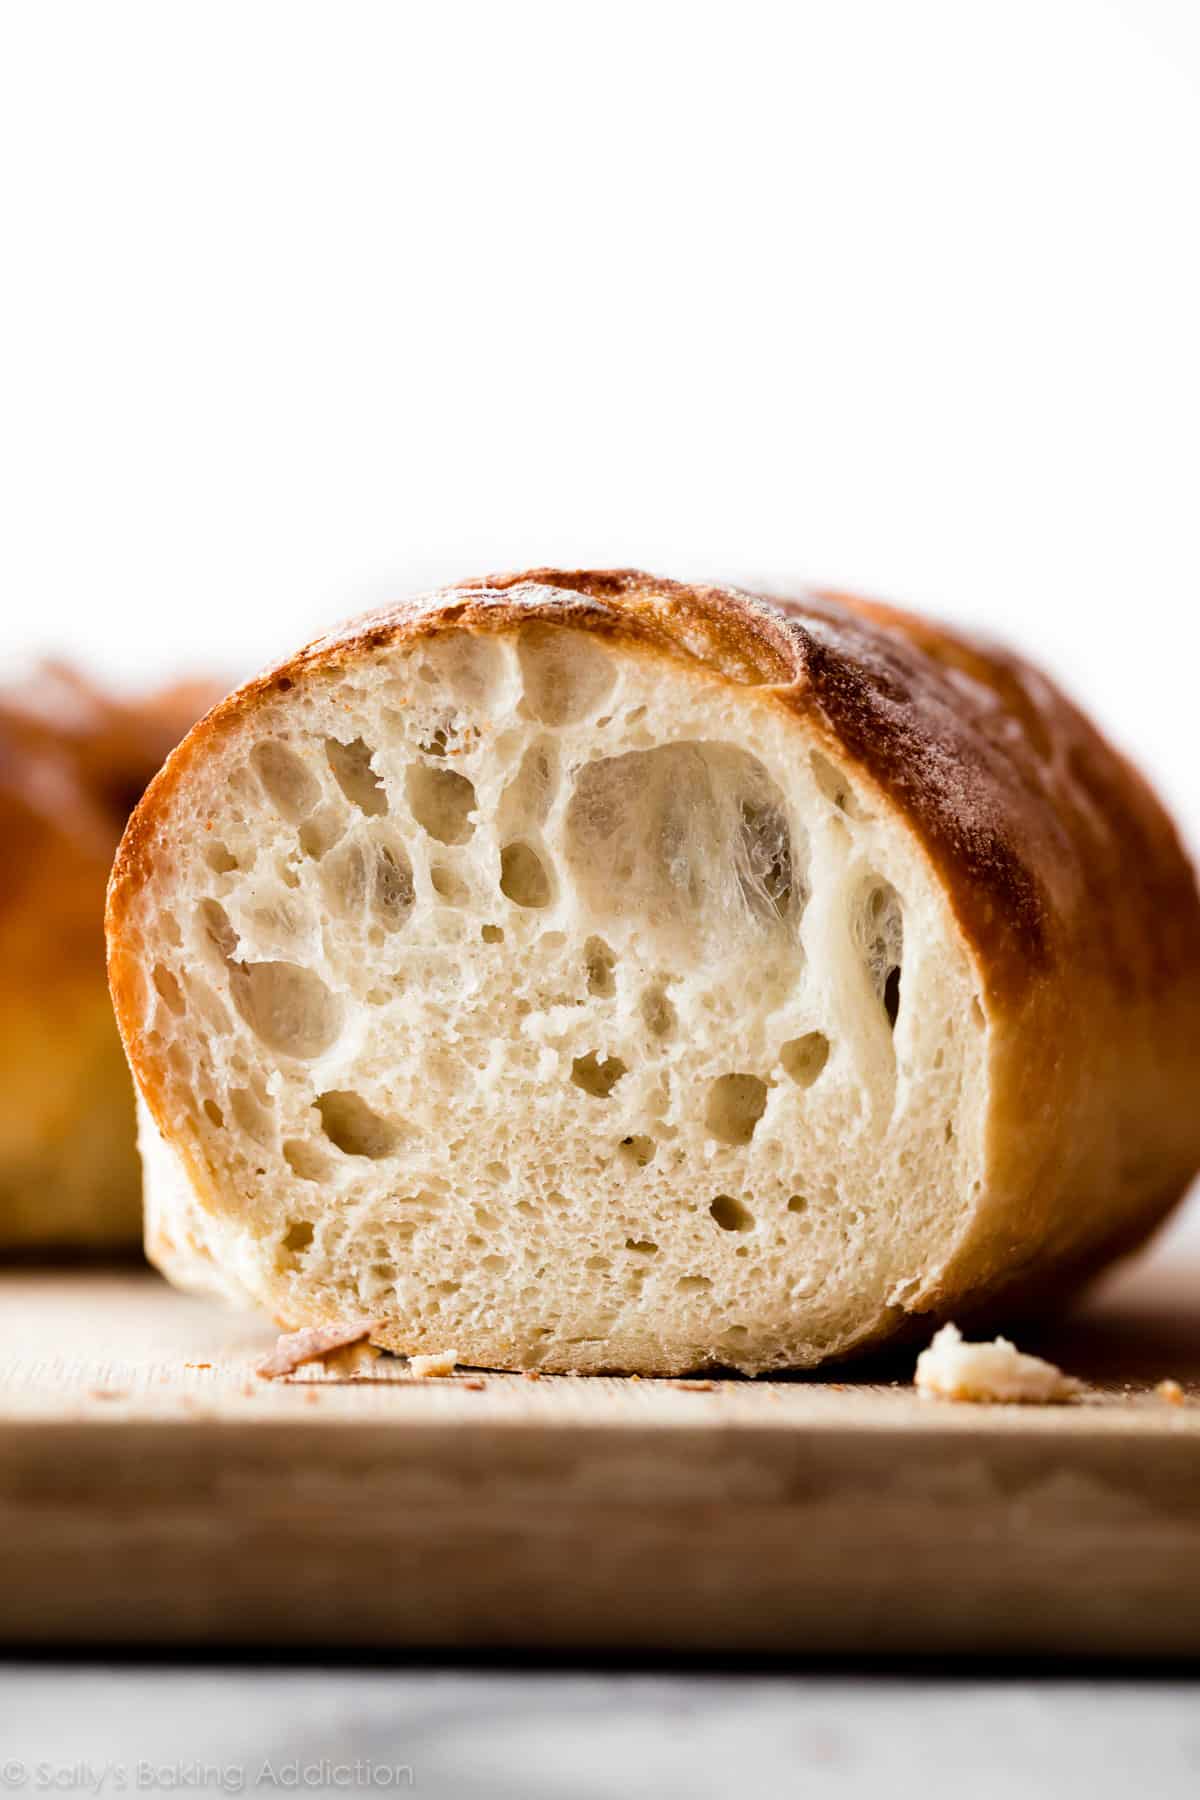
Baker’s Tip: Avoid adding too much flour to the dough as you work with it. The stickier it is—and the longer it sits in the refrigerator—the more likely you’ll have those big airy pockets of air in the crumb.
How to Make Homemade Artisan Bread in 5 Steps
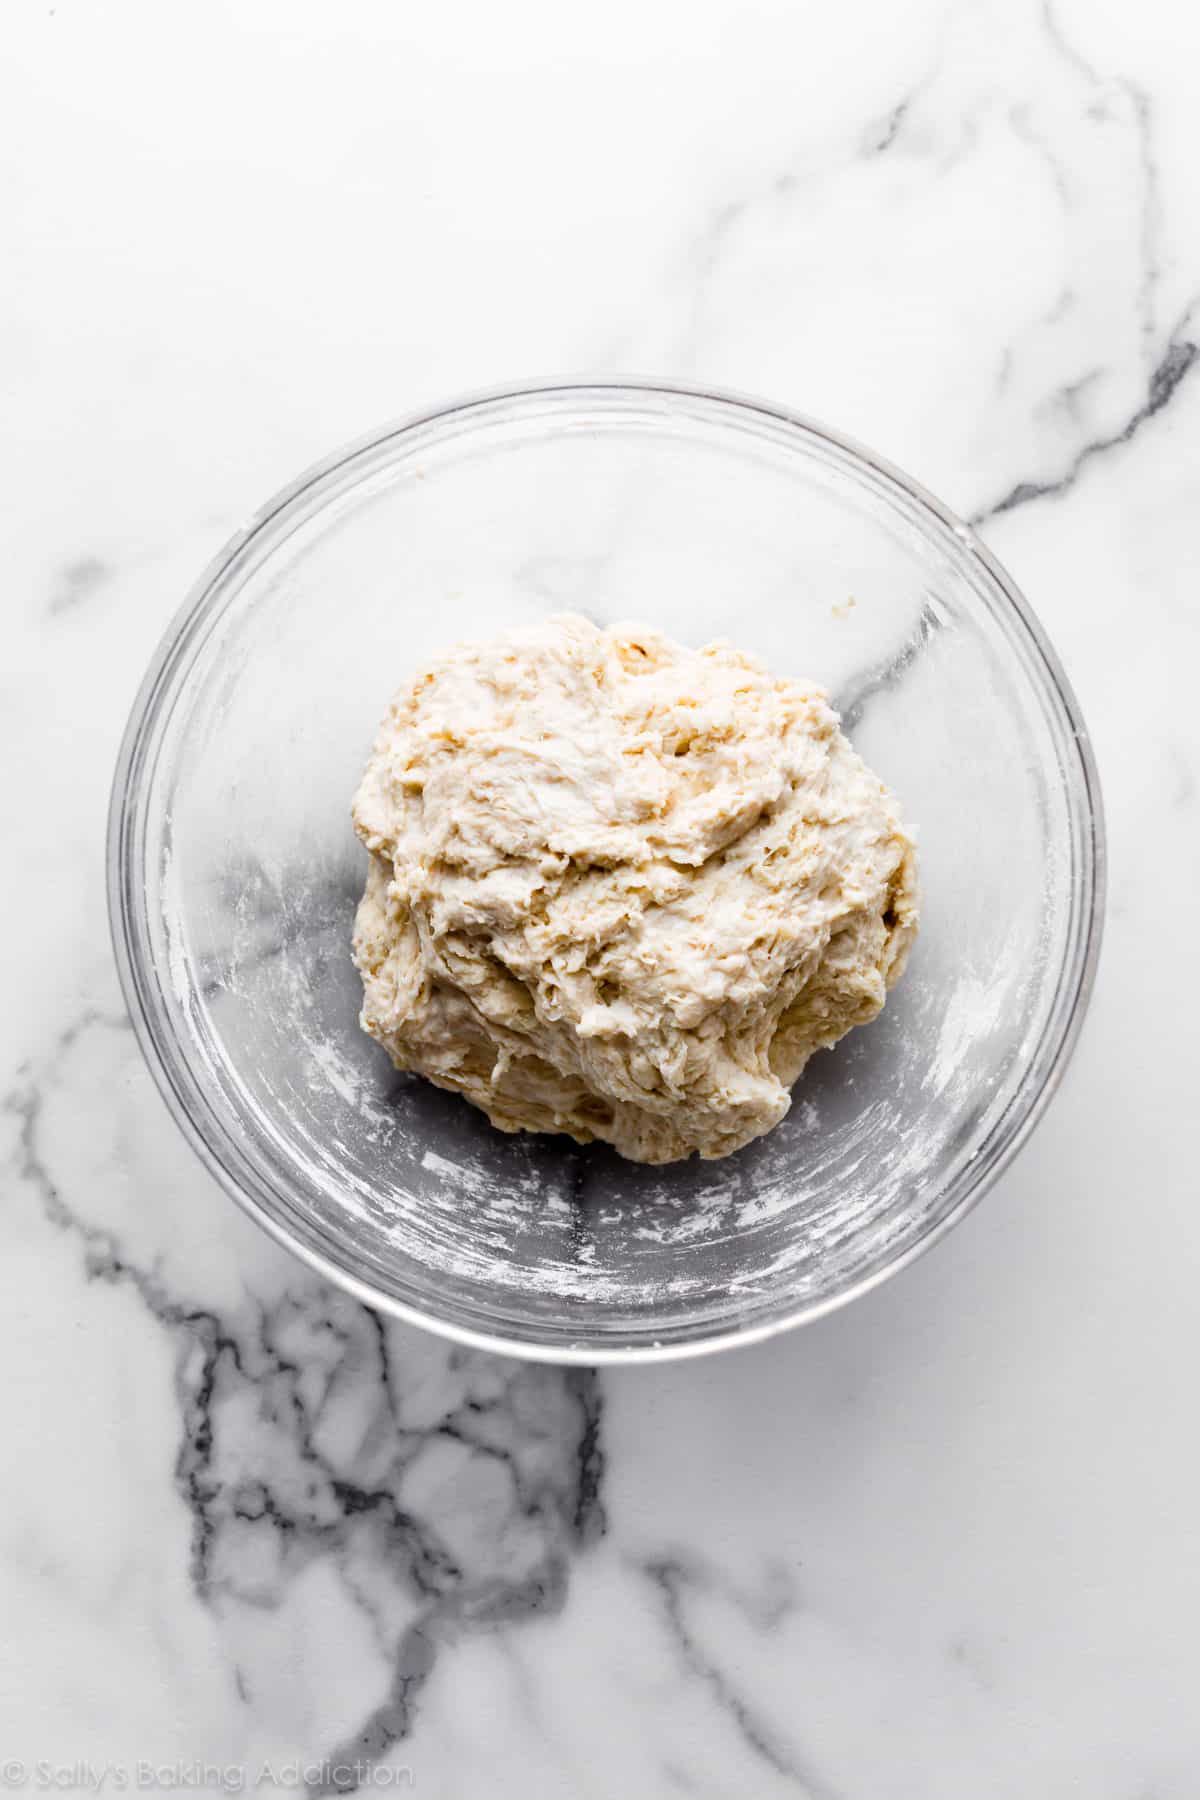
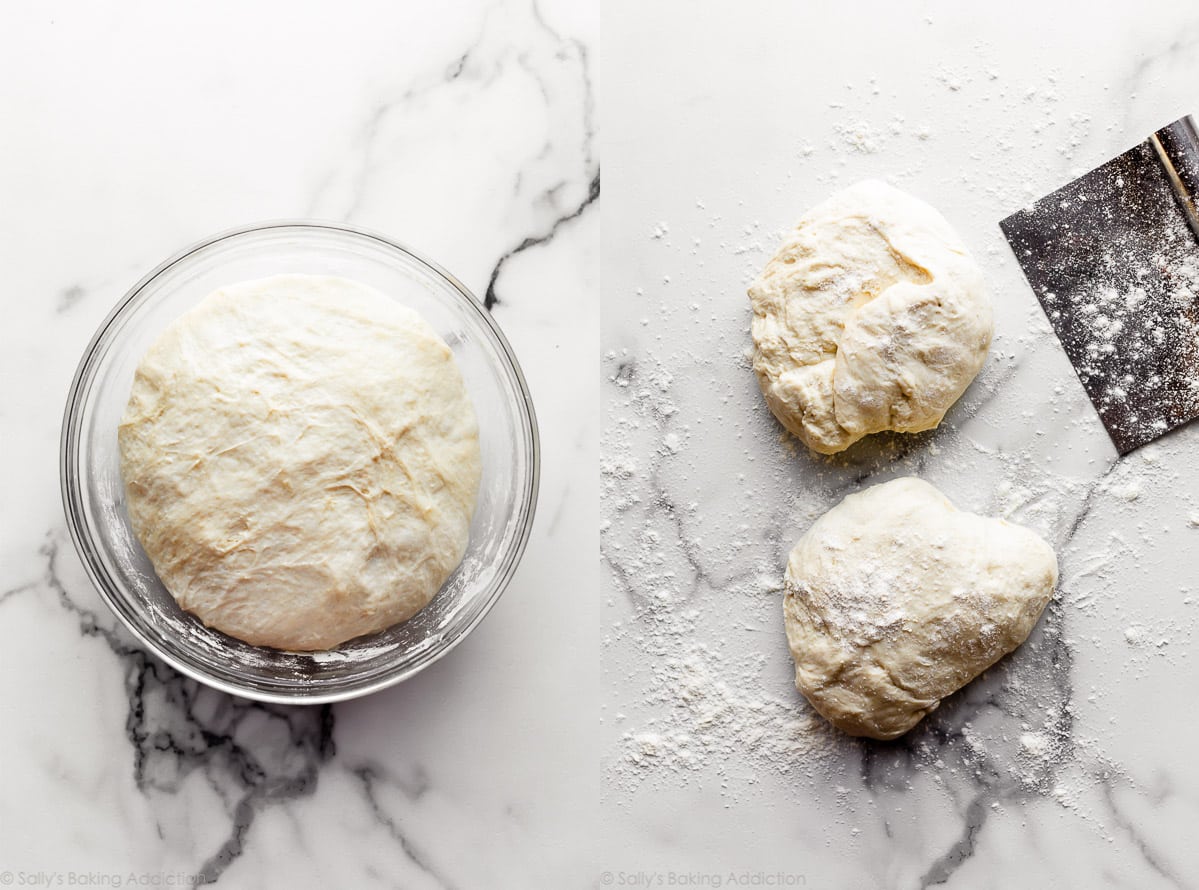
- Mix the dough ingredients together. At first the dough will seem very dry and shaggy and you’ll question if it will even come together. But it will. Use a spatula at first, then switch to your hands to ensure all of the flour is moistened. The dough is actually a little sticky after it’s thoroughly mixed.
- Let it rise at room temperature for 2-3 hours. Cover the dough and let it rise at room temperature for about 2-3 hours until doubled in size.
- Use right away or refrigerate. After 2-3 hours, you can immediately continue with the next step. However, for ideal flavor and texture, I strongly recommend letting the dough sit in the refrigerator for at least 12 hours and up to 3 days. Yes, 3 full days! I usually only let it rest for about 18 hours. During this crucial step, the cold air slows the fermentation process and adds so much flavor and texture. So, you can bake bread in 2-3 hours or in 3 days. The longer it sits, the better it tastes. 🙂
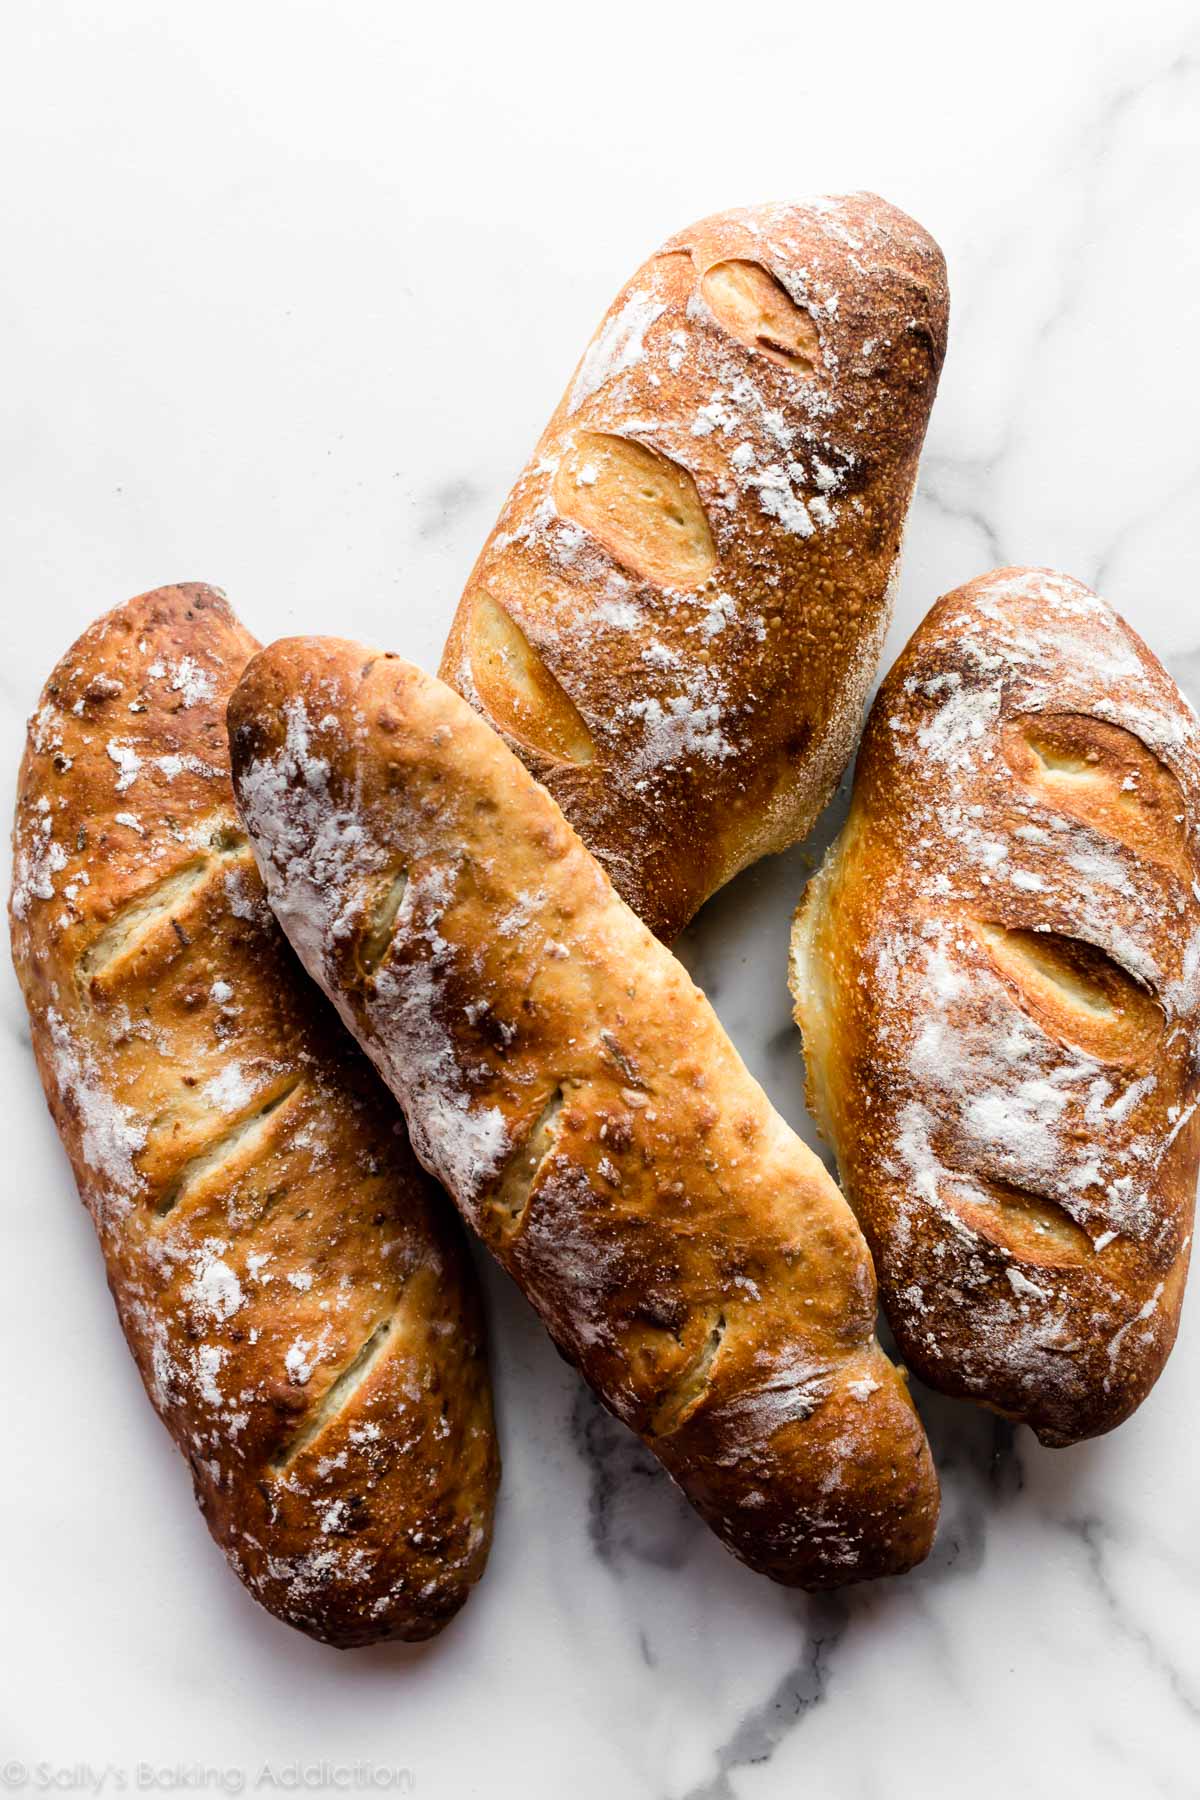
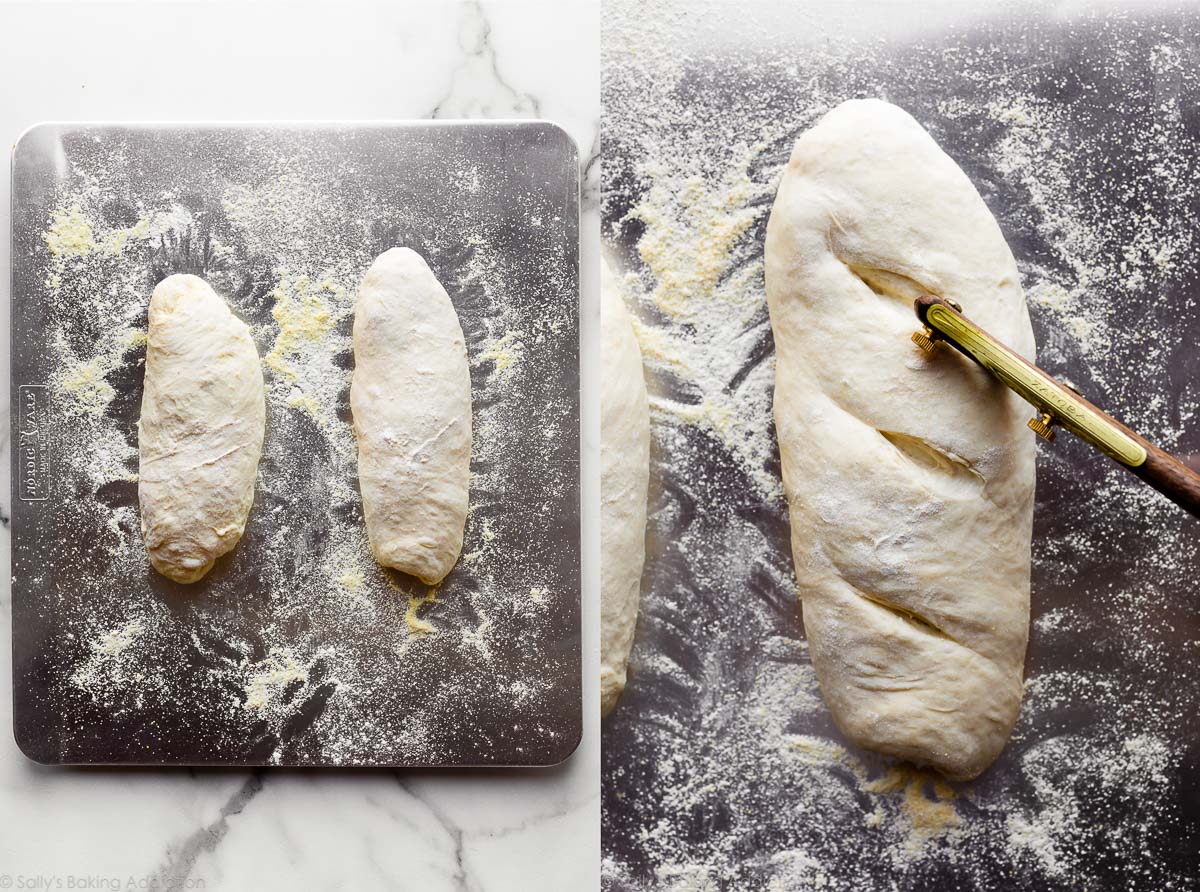
- Shape into 2 loaves or 1 boule. Rest as oven preheats. You can shape the bread into a round loaf (boule) or two longer loaves. I usually make two longer loaves side-by-side on a flat baking sheet, about 9×3 inches each. Preheat the oven to a very hot 475°F (246°C). The extremely hot air will immediately set the crust so the bread rises up instead of spreading all over. Score the loaves on top right before baking. Scoring also helps control the bread’s expansion. To help ensure a crispier crust, after the oven preheats, pour boiling water into a metal or cast iron baking pan on the bottom oven rack. Immediately place the baking sheet inside and shut the oven door to trap the steam. The steam will help create that coveted crisp crust.
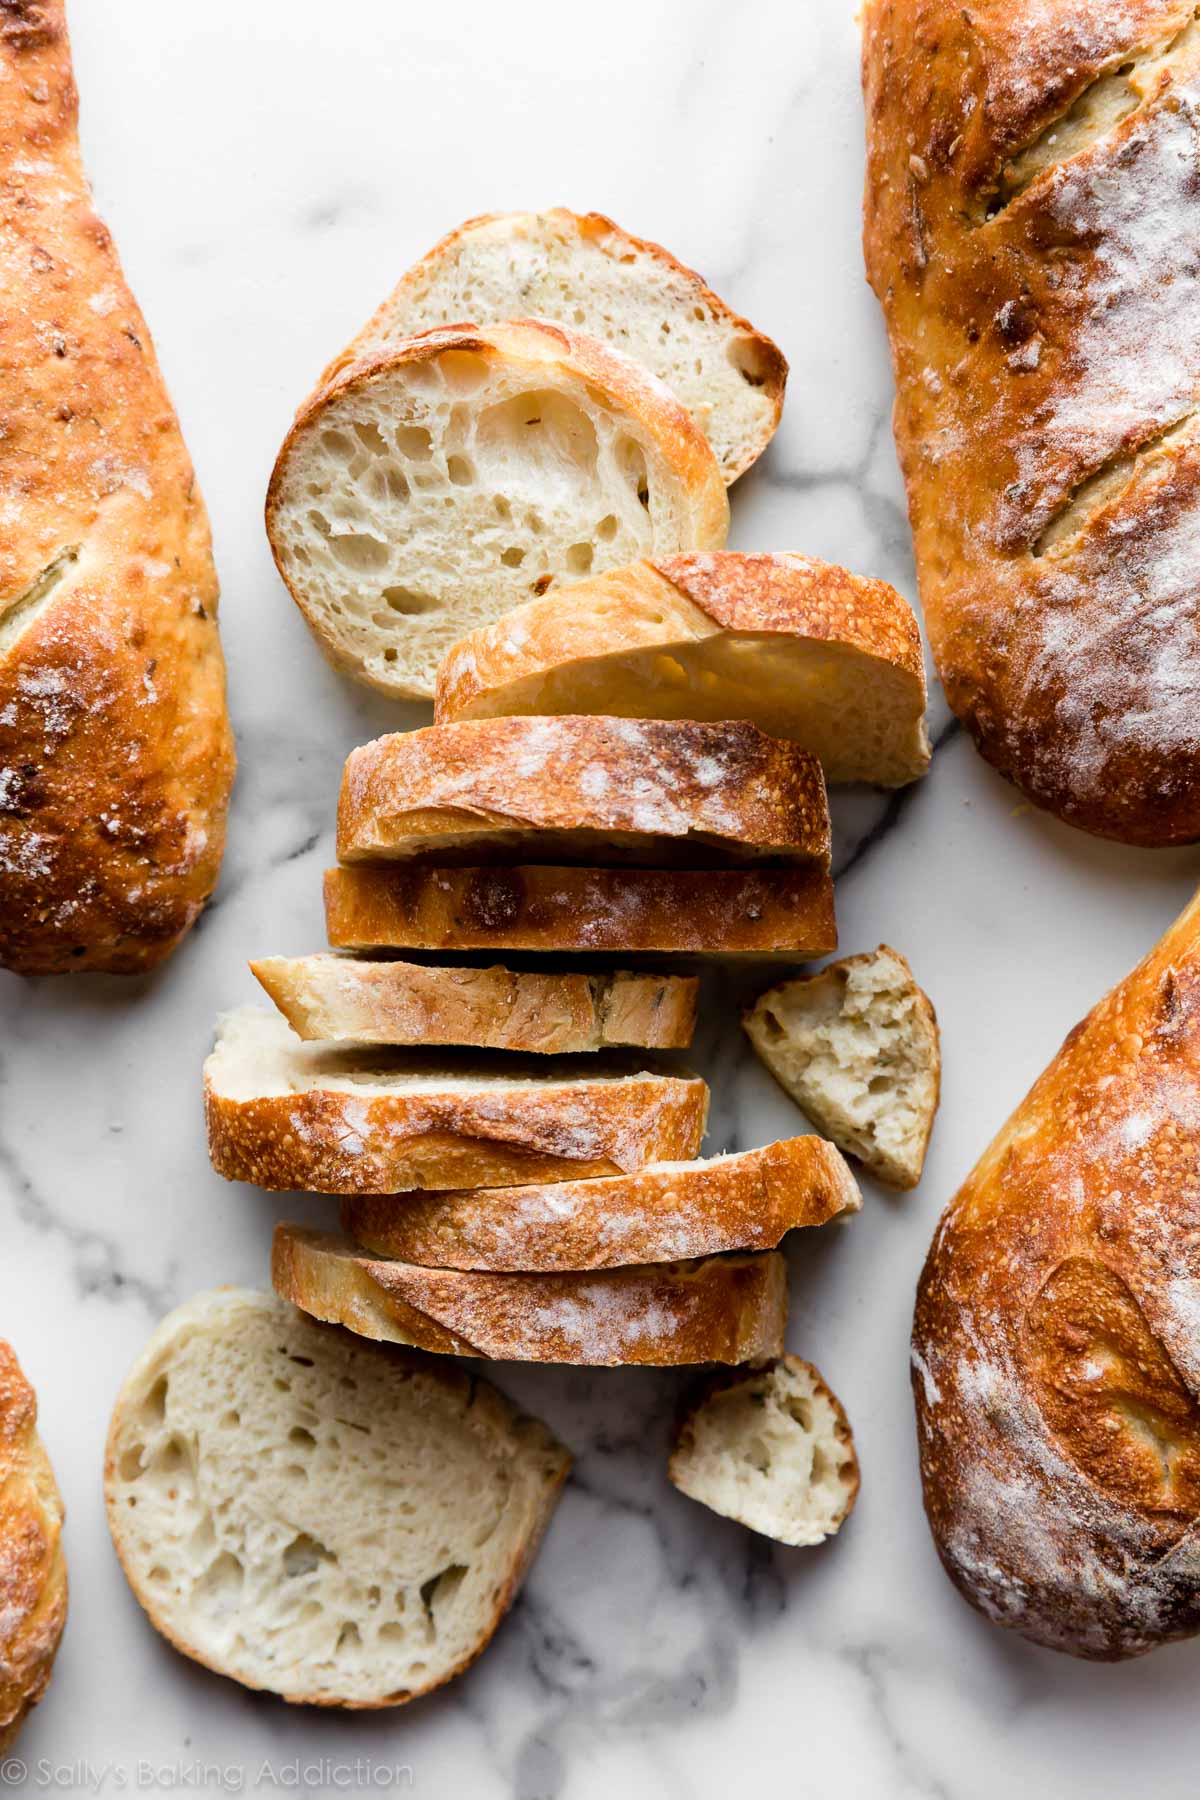
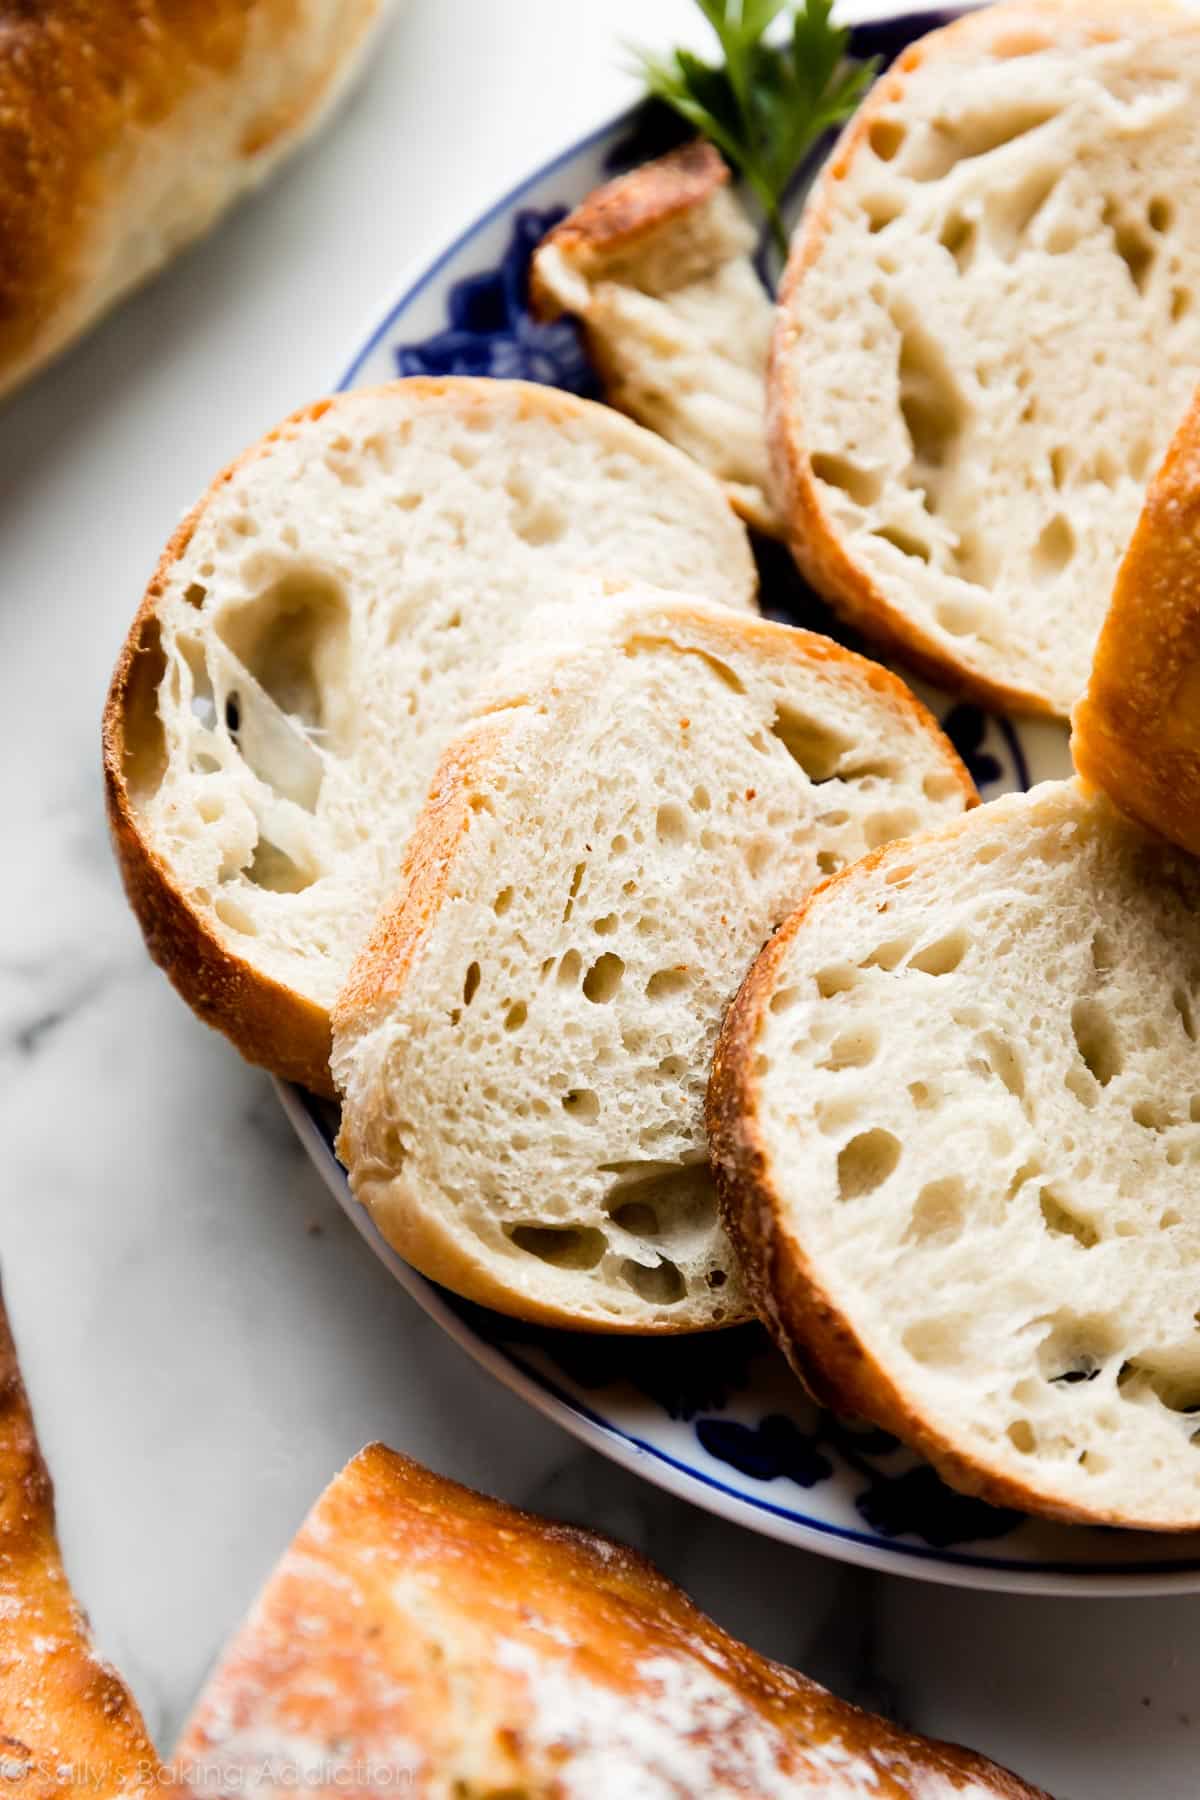
- Bake until golden brown, about 20-25 minutes. Gently tap the loaves because if they sound hollow, they’re done.
Look at those deliciously soft holes inside! Reminds me of ciabatta or a French baguette, both of which can be a little more complicated to make.
Serve Artisan Bread With
- Slather with homemade honey butter or cinnamon butter
- Slice and dunk in crab dip, beer cheese dip, garlic & bacon spinach dip, or even homemade Italian dressing
- Serve alongside slow cooker chicken chili or pumpkin chili
- As a dunker for homemade tomato soup, creamy cauliflower potato soup, minestrone soup, creamy chicken noodle soup, crab soup, or slow cooker creamy chicken & corn soup
- With a big bowl of mac & cheese or spaghetti with slow cooker turkey meatballs
- Use for my goat cheese & honey crostini
- It’s the perfect starch in breakfast casserole or baked apple cider French toast
- Use it to make homemade garlic bread or homemade croutons
- With anything because homemade bread is everything’s best friend

Homemade Artisan Bread Recipe
- Prep Time: 4 hours
- Cook Time: 25 minutes
- Total Time: 4 hours, 25 minutes
- Yield: 2 8-inch loaves
- Category: Bread
- Method: Baking
- Cuisine: American
Description
Even if you’ve never made homemade bread or worked with yeast before, this homemade artisan bread is for you. Watch the video tutorial below and review the recipe instructions and recipe notes prior to beginning. If you’re new to working with yeast, reference my Baking with Yeast Guide for answers to common yeast FAQs.
Ingredients
- 3 and 1/4 cups (about 430g) bread flour (spooned & leveled), plus more for hands and pan
- 2 teaspoons (about 6g) instant yeast
- 2 teaspoons (about 9g) coarse salt (see note)
- 1 and 1/2 cups (360ml) water, close to room temperature at about 70°F (21°C)
- optional: cornmeal for dusting pan
Instructions
- In a large ungreased mixing bowl, whisk the flour, yeast, and salt together. Pour in the water and gently mix together with a silicone spatula or wooden spoon. The dough will seem dry and shaggy, but keep working it until all the flour is moistened. If needed, use your hands (as I do in the video tutorial below) to work the dough ingredients together. The dough will be sticky. Shape into a ball in the bowl as best you can.
- Keeping the dough in the bowl, cover the dough tightly with plastic wrap or aluminum foil and set on the counter at room temperature (honestly any normal room temperature is fine!). Allow to rise for 2-3 hours. The dough will just about double in size, stick to the sides of the bowl, and have a lot of air bubbles.
- You can continue with step 4 immediately, but for absolute best flavor and texture, I strongly recommend letting this risen dough rest in the refrigerator for at least 12 hours and up to 3 days. Place covered dough in the refrigerator for 12 hours – 3 days. I usually let it rest in the refrigerator for about 18 hours. The dough will puff up during this time, but may begin to deflate after 2 days. That’s fine and normal—nothing to worry about.
- Lightly dust a large nonstick baking sheet (with or without rims and make sure it’s nonstick) with flour and/or cornmeal. Turn the cold dough out onto a floured work surface. Using a sharp knife or bench scraper, cut dough in half. Some air bubbles will deflate as you work with it. Place dough halves on prepared baking sheet. Using floured hands, shape into 2 long loaves about 9×3 inches each (doesn’t have to be exact) about 3 inches apart. Loosely cover and allow to rest for 45 minutes. You will bake the dough on this prepared baking sheet.
- During this 45 minutes, preheat the oven to 475°F (246°C).
- When ready to bake, using a very sharp knife or bread lame (some even use kitchen shears), score the bread loaves with 3 slashes, about 1/2 inch deep. (“Score” = shallow cut.) If the shaped loaves flattened out during the 45 minutes, use floured hands to narrow them out along the sides again.
- Optional for a slightly crispier crust: After the oven is preheated and bread is scored, place a shallow metal or cast iron baking pan or skillet (I usually use a metal 9×13-inch baking pan) on the bottom oven rack. Carefully and quickly pour 3-4 cups of boiling water into it. Place the scored dough/baking pan on a higher rack and quickly shut the oven, trapping the steam inside. The steam helps create a crispier crust.
- Place the shaped and scored dough (on the flour/cornmeal dusted pan) in the preheated oven on the center rack. Bake for 20-25 minutes or until the crust is golden brown. Gently tap the loaves—if they sound hollow, the bread is done. For a more accurate test of doneness, the bread is done when an instant read thermometer inserted in the center reads 195°F (90°C).
- Remove the bread from the oven and allow to cool for at least 20 minutes before slicing and serving. Store leftovers loosely covered at room temperature for up to 5 days or in the refrigerator for up to 1 week.
Notes
- Make Ahead & Freezing Instructions: The dough can sit in the refrigerator for up to 3 days, so this is a wonderful recipe to begin ahead of time. You can also bake the bread, allow it to cool, and freeze for up to 3 months. Thaw at room temperature before serving. You can also freeze the dough. Complete the recipe through step 3. Wrap in plastic wrap and place in a freezer-friendly container. To bake, allow dough to thaw overnight in the refrigerator, or for 2-3 hours at room temperature. Continue with step 4 and the rest of the recipe instructions.
- Special Tools (affiliate links): Glass Mixing Bowls | Silicone Spatula or Wooden Spoon | Baking Sheets | 2-cup Measuring Cup | Bread Lame | Instant Read Thermometer
- Flour: For absolute best flavor and chewy texture, I strongly recommend using bread flour. You can use a 1:1 substitution of all-purpose flour in a pinch with no other changes to the recipe. I recommend avoiding whole wheat flour in this dough. If necessary, use half bread flour and half whole wheat flour. The bread will taste dense.
- Yeast: You can use instant or active dry yeast, but I highly recommend an instant (aka “rapid rise” or “quick rise” yeast). The bread will rise faster. I usually use Platinum yeast by Red Star, which is an instant yeast. 2 teaspoons is a little less than 1 standard packet. If using active dry yeast, there are no changes needed to the recipe. The rise time in step 2 may take longer.
- Salt: Use a coarse salt, such as coarse sea salt, in this bread. I find the flavor slightly lacking when using regular table fine salt. If you only have fine salt, reduce to 1 and 1/2 teaspoons.
- Water: Use cool water. 70°F (21°C) is great, but the exact temperature doesn’t matter as long as it’s not hot or warm.
- Round Loaf: If you want to shape the dough into a boule (round loaf) simply shape into a round ball instead of 2 loaves in step 4. Baking instructions are the same, but the loaf will take a few extra minutes in the oven. If you want to bake the boule in a dutch oven, see next note.
- Using a Dutch Oven: Follow this dough recipe through step 3, then follow the simple shaping/baking instructions (steps 2-5) in my Cranberry Nut No Knead Bread recipe including using the parchment paper. If your parchment paper can’t withstand heat this high, you can either lower the oven temperature and bake the bread for longer or grease the Dutch oven instead.
- Using a pizza stone: If you want to bake your bread loaves on a pizza stone, place pizza stone in the preheating oven. In step 8, place the shaped and scored dough on your preheated pizza stone. If the bottom of the shaped dough is pretty sticky, dust the hot pizza stone with some extra cornmeal. Bake as directed.
- No Nonstick Pan: If you don’t have a nonstick baking sheet, line it with parchment paper instead. Coat with a dusting of flour and/or cornmeal before placing the dough on top. Parchment paper can burn, so it’s best to check the box to see how much heat yours can tolerate. Lower your oven heat if necessary and bake the bread for longer until golden brown and when gently tapped, sound hollow.
- Flavor ideas: Before pouring in the water in step 1, add any of the following ingredients/combination of ingredients to the dry ingredients in the bowl: 4 cloves minced garlic + 3 Tablespoons chopped rosemary, 3 Tablespoons your favorite fresh herb (chopped), 1 cup your favorite shredded cheese, a diced jalapeño, 3/4 – 1 cup dried cranberries and/or chopped nuts, 2 teaspoons garlic powder, etc.
- Reference my Baking with Yeast Guide for answers to common yeast FAQs.
- Recipe adapted from King Arthur Flour & Red Star Yeast, similar method originally from Jim Lahey.
Nutrition
- Serving Size: 2 slices
- Calories: 136
- Sugar: 0.1 g
- Sodium: 389.8 mg
- Fat: 0.7 g
- Carbohydrates: 27.2 g
- Protein: 4.7 g
- Cholesterol: 0 mg


Reader Comments and Reviews
Which coarse sea salt is recommended? Thank you!!
Hi Katie, any brand of coarse sea salt will work well here. Hope you enjoy the bread!
My husband and I moved to S.C. 5 years ago from Chicago and have been desperate to find a hard crust artisan bread. Tried this today and both of us are thrilled. Didn’t give it time in fridge, just made it right away. Will definitely try leaving it rest longer to see the outcome. Easy, relatively quick and delish!!!
I started this recipe fully prepared to struggle, but it was so easy! The mixing didn’t need any particular muscle, and the shaping and scoring required zero effort. I was sure I messed up somewhere, but it actually turned into really good crusty bread! I will definitely make this again.
We’re so happy to read this, Elsa! Thanks for giving this bread recipe a try.
Thank you Sally. I use this recipe consistently for Baguettes. Although I add 1/2 tsp of yeast and salt.
Hey Sally! Made this today and thought it turned out really good. Thanks for the recipe and detailed instructions. Will definitely make again.
One question – when I cut into the first loaf, it seemed a touch gummy in the middle. Any idea what might cause that or suggestions on how to fix it next time? I baked for 25 min & it was up to temp when I removed it from the oven.
Hi Ariel, we’re so glad you enjoyed the bread! How soon after baking did you cut into the bread? Sometimes cutting it too soon before it’s had time to cool can make the bread a bit gummy on the inside. Also, be sure to spoon and level your flour (or use a food scale) to ensure just the right amount — too much can cause the bread to be overly dense which can also contribute to that gummy feeling. Finally, an extra minute or two in the oven will help as well to make sure the bread is fully baked. Hope these tips help for next time!
Hello Sally’s team.
Making this bread for a while now, love it, so little work and tastes so good.
I am using the 3 hour option. And I also do not use a dutch oven.
Only “problem” bread is a bit low (not deflated but just low and wide) how do I make it higher? While not using a dutch oven?
(I learned how to shape it and have a bit of tension while balling it a bit but it didn’t change anything)
Hi Ken, this won’t be a very tall bread! The best way to get height is to maintain the air bubbles formed during the rise time by handling the dough as little as possible. So glad you enjoyed it!
I made three sets of dough and baked two of them today. The bread looked and tasted amazing. I kept one set of dough in the fridge to see how the flavor improves.
My question is I wrapped the baked bread in plastic wrap and put it in a ziplock bag. What is the best way to thaw and heat it up? (I didn’t slice it.)
Hi Julia, to thaw the frozen baked bread, thaw overnight in the refrigerator. To reheat, you can place the bread in the oven at a lower temperature for a few minutes until warmed to your liking. We’re glad you enjoyed it!
I made this morning and left the dough in the fridge overnight! The bread rose more than I expected and tasted delicious! My only issue with mine was, the crumb of the bread reflected more like cake than bread, there was plenty of bubbles in the bread, and I knew it was going to be denser than expected but is it meant to be like a cake like crumb? If not, I’m not sure where I went wrong as I followed the recipe as closely as I could. Only difference is, my oven only goes to 230c so that was the max I could bake at. Is this a case of I let the dough rise for too long before moving to the fridge?